
Best Nail Art Designs for Beginners
Start With the Basics
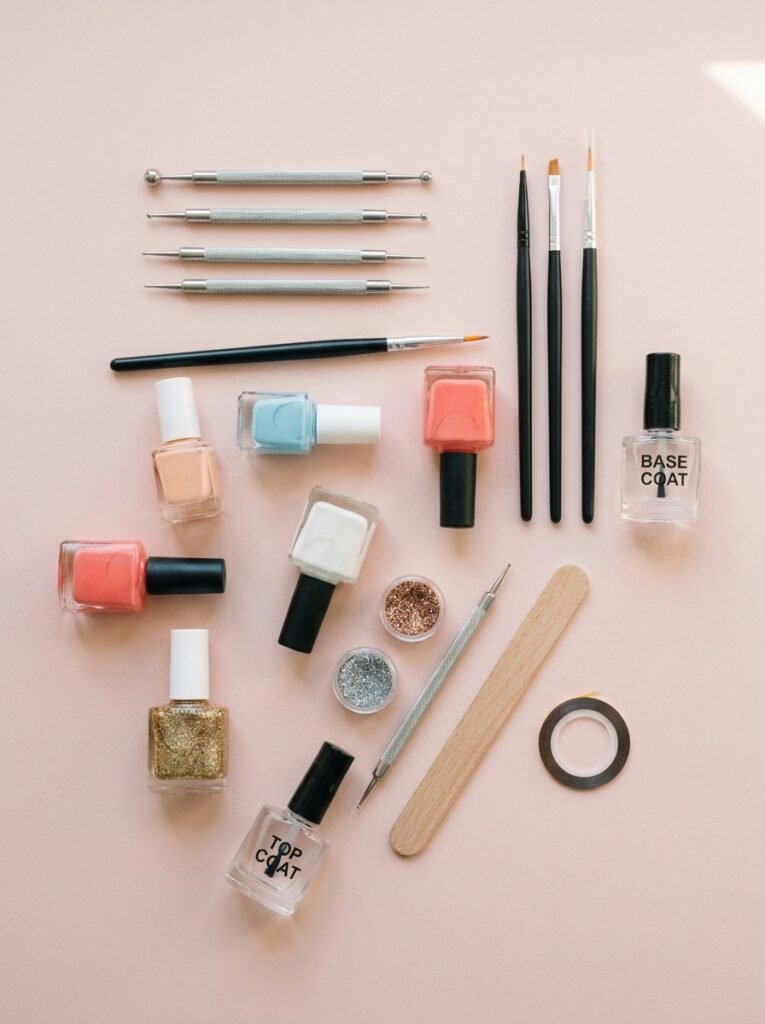
Before we dive into designs, let me quickly cover the essentials you will need. Having the right basics makes everything smoother and far less frustrating. So gather a few simple supplies before you begin.
You really only need a base coat, a few polish colors, and a good top coat. A couple of cheap tools like dotting tools and thin brushes help too. As a result, you can create loads of designs without spending a fortune.
Prepping your nails properly is just as important as the art itself. File them into shape, push back your cuticles, and always apply a base coat. So your manicure looks neat and lasts much longer.
Classic French Tips
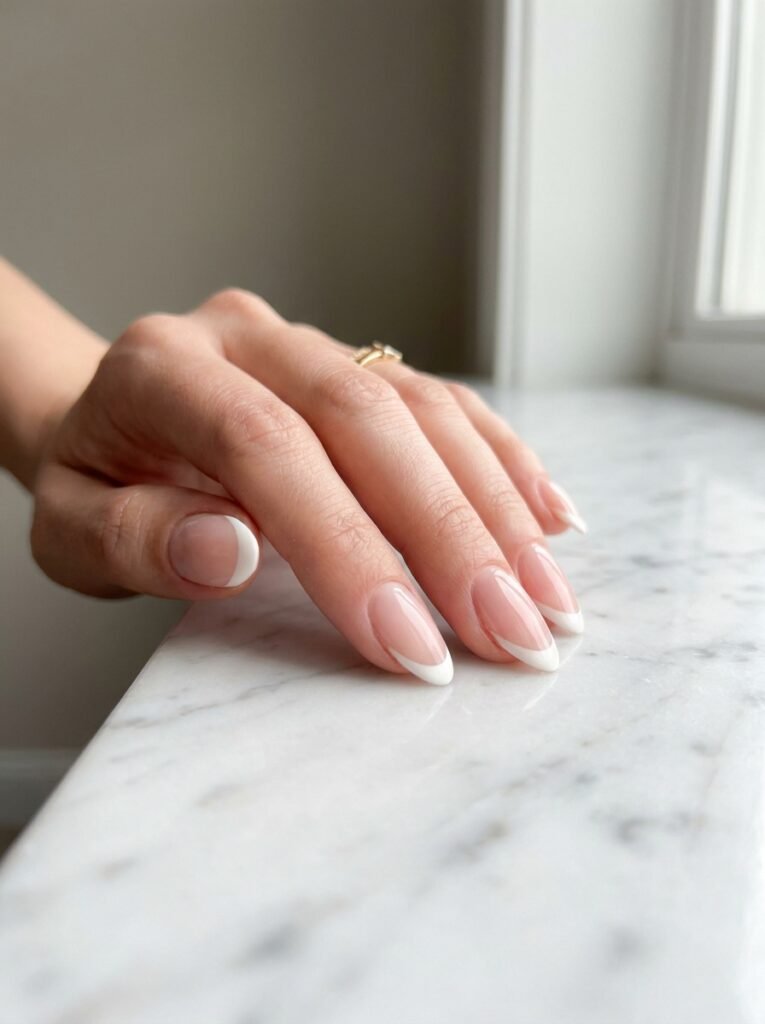
You cannot talk about beginner nail art without mentioning the timeless French manicure. This elegant look features a soft nude base with white tips. So it is sophisticated, simple, and perfect for any occasion.
The trick for beginners is to take your time with the tips. You can use guide stickers or simply paint slowly with a steady hand. As a result, you get those clean lines without too much fuss.
Once you master the classic version, you can get playful with it. Try colored tips, glitter tips, or even tiny hearts instead of the usual white. So this one design opens up endless creative possibilities.
Simple Polka Dots

Polka dots are honestly one of the best nail art designs for beginners to try first. They are quick, cute, and almost impossible to mess up. So they are a wonderful confidence booster when you are starting out.
All you need is a dotting tool, or even the end of a bobby pin. Dip it into your polish and press gently onto your nail. As a result, you create perfect little dots with zero effort.
You can play with different colors, sizes, and patterns too. Scatter them randomly or line them up neatly for variety. So this simple technique offers so much room for creativity.
Easy Color Blocking

Color blocking sounds fancy, but it is genuinely beginner friendly. This design uses two or more bold colors side by side on each nail. So it looks modern and striking without any complicated skill.
The easiest way is to paint half your nail one color and half another. You can use tape to get a crisp, clean line down the middle. As a result, you achieve a sharp, professional looking finish.
Feel free to experiment with diagonal lines or different color combos. Bright contrasting shades look especially fun and eye catching. So this is a great way to play with color confidently.
Cute Accent Nails
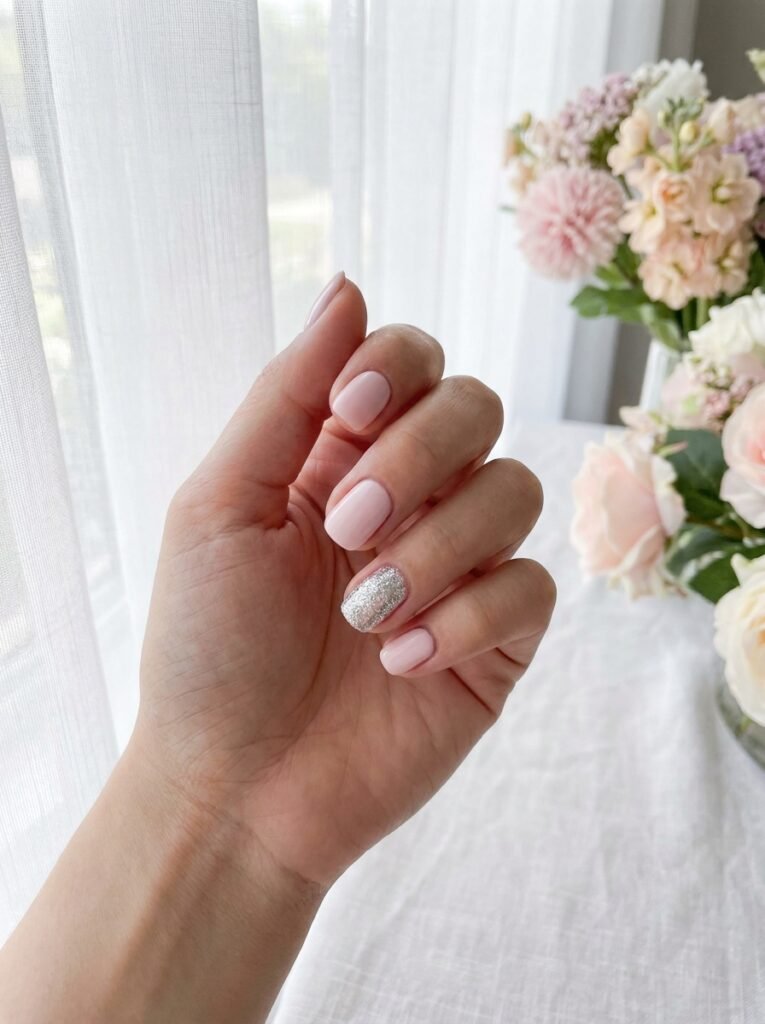
Accent nails are a clever trick that makes your manicure look effortlessly stylish. The idea is to paint most nails one color and make one stand out. So it adds interest without requiring lots of detailed work.
Choose one nail, usually the ring finger, to be your special accent. You can add glitter, a different color, or a tiny design just there. As a result, your whole manicure looks elevated with minimal effort.
This approach is perfect when you want something pretty but quick. You only need to focus your energy on a single nail. So it is ideal for busy days when time is short.
Glitter Gradient
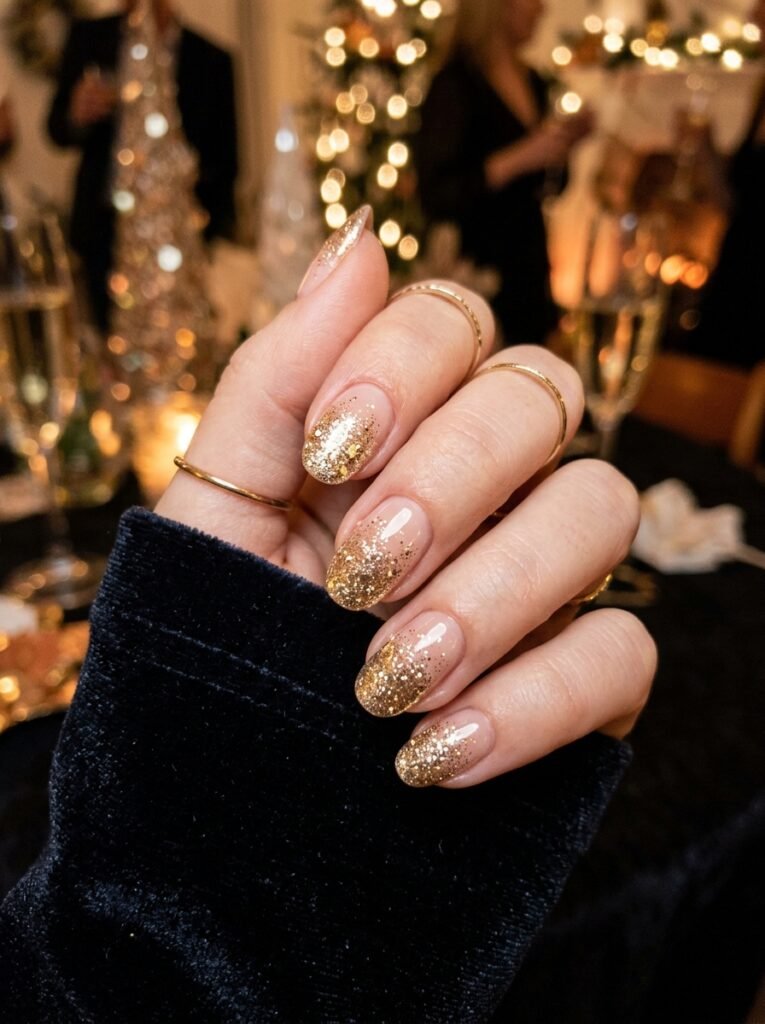
A glitter gradient adds a touch of sparkle that feels festive and fun. This look fades glitter from the tip of your nail toward the base. So it is glamorous yet refreshingly easy to achieve.
Simply apply more glitter polish at the tips and less as you move down. Build it up gradually with a couple of light layers. As a result, you create that gorgeous faded, twinkly effect.
This design is wonderful for parties and special occasions. It instantly makes your nails feel a little extra special. So keep a glitter polish handy for whenever you want some shimmer.
Simple Floral Designs

Florals might sound advanced, but the beginner versions are truly easy. Tiny dotted flowers are one of the best nail art designs for beginners who want something pretty. So do not let the delicate look fool you.
To make a simple flower, use your dotting tool to place five dots in a circle. Then, add one dot in the center for the middle. As a result, you create a charming little flower in seconds.
You can scatter these flowers or place one on an accent nail. Mixing colors makes them look even more delightful. So this sweet design is perfect for spring and summer.
Negative Space Nails

Negative space designs are modern, chic, and surprisingly simple. They leave parts of your natural nail bare as part of the design. So you actually do less painting while looking very on trend.
Try painting just the tips, a stripe, or a small shape and leaving the rest clear. The bare areas become a stylish feature in themselves. As a result, you get a fresh, contemporary look with minimal polish.
This style is also very forgiving for beginners. Since less of the nail is covered, there is less room for error. So it is a clever way to look polished while keeping things easy.
Striped Nails
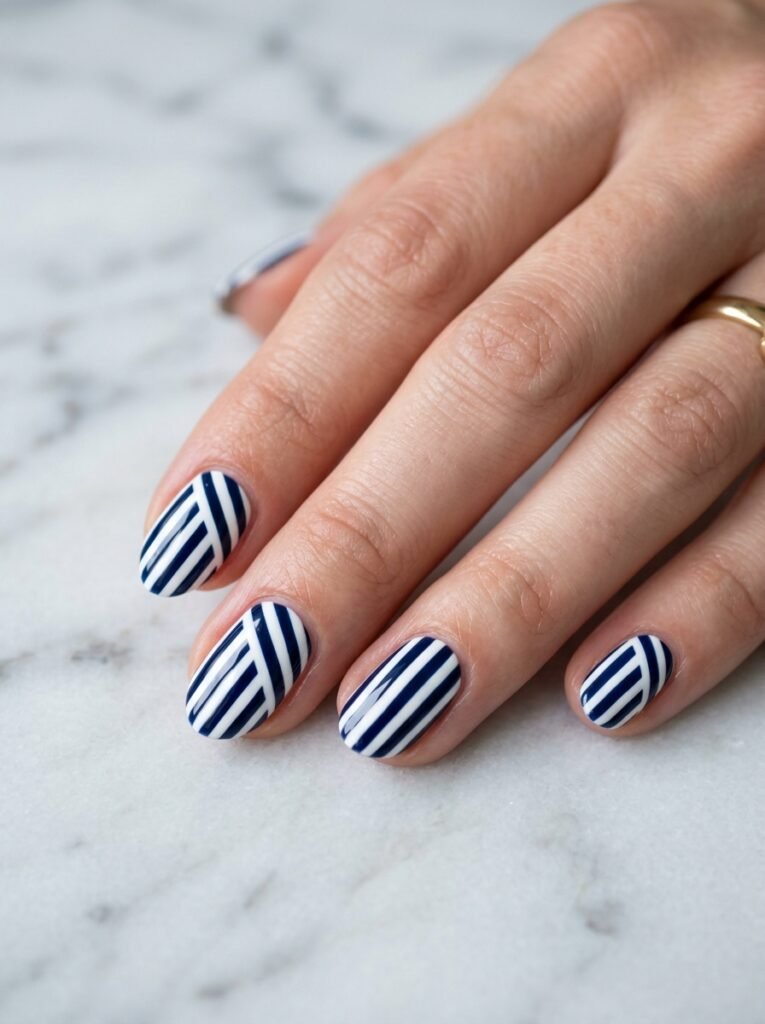
Stripes are a fun and easy way to add some graphic interest. You can create them using thin nail tape or a striping brush. So they are simple to do yet look wonderfully sharp.
Lay tape across your nail, paint over it, then peel it away while wet. This leaves behind crisp, clean stripes every time. As a result, you get a professional finish without a steady artist’s hand.
Experiment with different widths, colors, and directions for variety. Diagonal stripes or multiple thin lines look especially cool. So this versatile design never gets boring.
Ombre Nails

Ombre nails create a beautiful, blended fade between two colors. This soft, gradient effect looks dreamy and surprisingly professional. So it is a lovely technique to add to your beginner collection.
The easiest method uses a small makeup sponge. Dab two polish colors onto the sponge, then press it gently onto your nail. As a result, the colors blend softly into that gorgeous ombre look.
It might take a couple of tries to perfect, so be patient. A good top coat smooths everything out beautifully at the end. So do not give up if your first attempt is not flawless.
Simple Heart Designs

Little hearts are adorable and easier to paint than you might think. They add a sweet, playful touch to any manicure. So they are one of my favorite designs for beginners to try.
To make a tiny heart, place two dots side by side using a dotting tool. Then, gently drag the bottoms together into a point. As a result, you form a cute little heart almost instantly.
Add one heart on an accent nail or scatter several across your hands. Red and pink hearts feel classic and romantic. So this charming design is perfect for date nights or Valentine’s Day.
Marble Nails
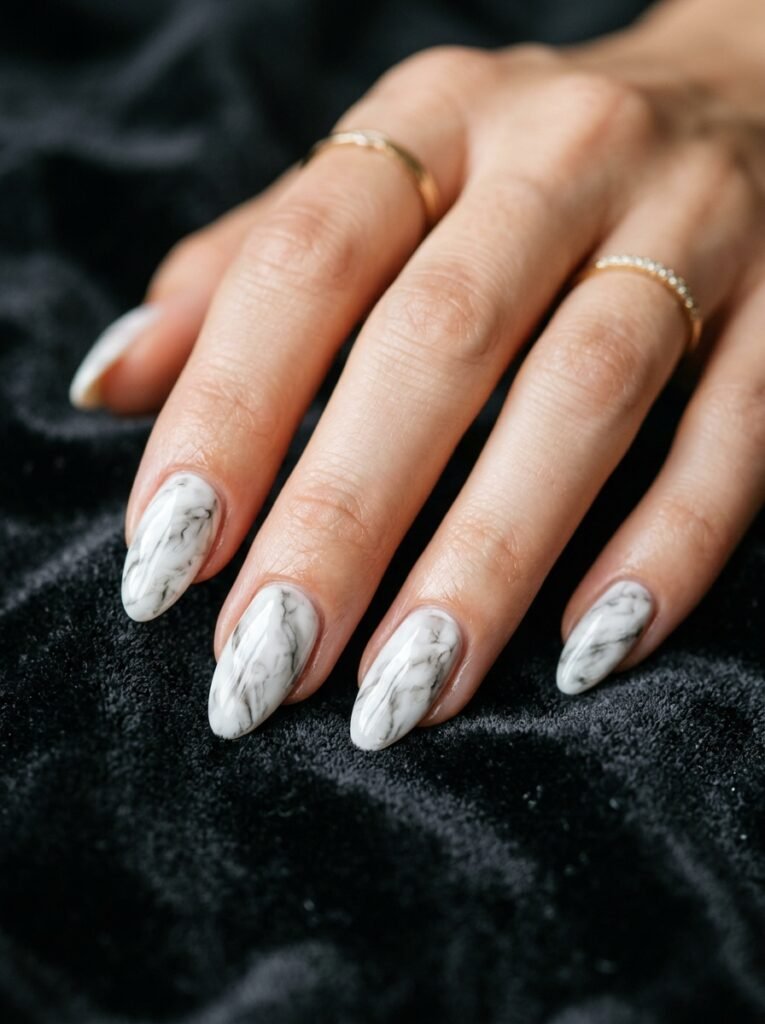
Marble nails look incredibly fancy, yet the beginner method is genuinely simple. This design creates a swirled, stone like effect on your nails. So it is a stunning look that always impresses.
The easy version uses a base color with a thin brush to add swirls. Drag a contrasting shade gently across the wet polish in random patterns. As a result, you create that beautiful, organic marble effect.
You can use white and grey for a classic stone look or play with bold colors. A glossy top coat makes the swirls really shine. So this design feels luxurious while staying beginner friendly.
Final Thoughts
When you look at all of these ideas together, it is clear how achievable nail art really is. The best nail art designs for beginners prove that you do not need expert skills to create something gorgeous. So with a little practice, beautiful nails can absolutely be your everyday reality.
My honest advice is to start with the simplest designs and build your confidence slowly. Polka dots and accent nails are perfect first projects to try. Before long, you will be tackling florals, marble, and ombre with ease.
Remember that nail art is meant to be fun, not stressful or perfect. Embrace the little mistakes and enjoy the creative process. So relax, experiment, and discover just how much you love designing your own nails.
Frequently Asked Questions
What nail art is easiest for total beginners?
Polka dots and accent nails are by far the easiest to start with. They need very little skill yet look adorable. So they are perfect for building your confidence early on.
What basic tools do I need for nail art?
You really only need a base coat, polish, and a top coat to begin. A dotting tool, thin brush, and some nail tape are helpful extras. So you can create lots of designs without spending much.
How do I make my nail art last longer?
Always start with a base coat and finish with a good top coat. Prepping your nails properly helps the polish grip better too. So these simple steps keep your designs looking fresh for days.
How can I fix mistakes while doing nail art?
A small brush dipped in nail polish remover works wonders for cleanup. Gently trace around the edges to tidy any smudges. So little mistakes are honestly very easy to correct.
Do I need expensive products to do nail art at home?
Not at all, and that is the beauty of it. Affordable polishes and a few cheap tools work perfectly well. So you can enjoy gorgeous nail art on any budget.
